The topic of aperture in photography has been described extensively, so we’ll leave it to other web pages to make the point (http://en.wikipedia.org/wiki/Aperture, especially the “See Also” section). The purpose of this page is to give a few examples of various f-stops and the result on an image.
But first, a smidgen of background information is necessary. In order to properly expose a picture, a digital camera needs to control how much light hits the sensor. There are several ways to do this and changing any one parameter below will result in at least two changes to the final image. As a competent photographer, you get to choose what changes you will make in order to achieve a desired photo.
Shutter speed: The faster the shutter closes, the less light hits the sensor. However, the longer it’s open, the more light hits the sensor – and the more susceptible the image is to blur. Shutter speeds are measured in seconds: 1/500th is common for stopping the fast action of a sports car. 1/200th is probably sufficient for sports football. 1/60th of a second is common for flash-photography. At lower shutter speeds (especially with a long zoom lens), a tripod will be needed to steady the camera. Quick rule of thumb: if your shutter speed is slower than the inverse of your zoom, you’ll need a tripod. For example, if your zoom lens is set to 200mm, if you’re taking a photo and your shutter speed is 1/150th of a second, you’ll need a tripod.
ISO: This relates to the sensitivity of the sensor (in film photography, this relates to the ‘speed’ of the film). The higher the ISO, the better the camera can capture images in dim light. With a high ISO, indoor photos can be taken without a flash. However, as the ISO goes higher, the image becomes grainy and small specs of “noise” become visible in the photo. (This is true for both film and digital images.) The quality of your camera will determine how noisy it gets at a certain ISO. A cheap camera will not produce good pictures at an ISO of 300, whereas a good quality SLR can still produce decent photos at an ISO of 1000.
Aperture:
To control the amount of light that enters the camera, a small adjustable circular opening is used to allow more or less light in. This is called your aperture and the size of the opening is measured in what’s called “f-stop”. When talking about f-stops, the higher the number, the smaller the aperture. So an f-stop of f/2 allows much more light in than an aperture set to f/8. All camera lenses are calibrated by the manufacturer so that a given f-stop allow the same amount of light through the lens. For example, if a particular setting calls for an f-stop of 16, whether your lens is a Canon zoom or a Vivitar wide-angle lens, setting it to f/16 will create a properly exposed photo.
There are a wide variety of factors that determine the particular f-stop range of a lens. Generally speaking, the lower the f-stop, the higher-quality (and larger) the lens. A low-quality lens might have an f-stop range from 3 to 8 while a high quality lens might have an f-stop of 2.8 to 32. If you have limited light available and you close your aperture down (to, say f/22), you’ll need to compensate by adding more light (flash), keeping the shutter open longer or increasing your ISO. The range of your lens’ f-stop is also affected by the telephoto/zoom properties of the lens. Generally speaking, longer zoom lenses have longer barrels and less light is available to the sensor, therefore even with the aperture open the widest, lower f-stops are not available. A typical 28-105mm zoom lens might start at f/3.5. At any rate, changing the aperture allows more or less light in to your camera’s sensor – and also changes another interesting property of your final image: the depth of field.
The depth of field is the region of focus for your particular camera’s setting. If your subject is standing 10 feet in front of your camera, the depth of field is the area before and after your subject: the area, for example, 2 feet in front of and behind your subject. 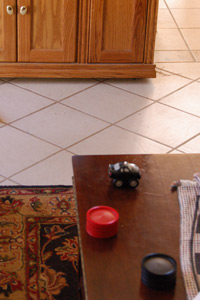 The whole point of this article is to demonstrate that the higher your f-stop (which means a small aperture), the less light gets in – BUT – the larger your depth of field. Things in front and behind your subject will be in focus. If you choose a low f-stop (large aperture), you’ll have a small depth of field: things in front and behind your subject will not be in focus.
The Setup
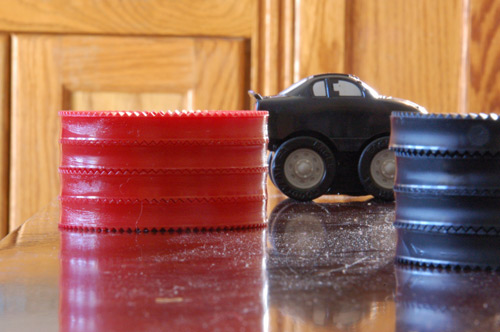
To demonstrate the relationship of aperture to field of focus, I selected some objects and toys that just happened to be sitting nearby on my coffee table: A toy car (about 3″ long); a stack of red checkers (about 3″ in diameter); and a stack of black checkers. I placed them about 10 inches apart on a coffee table. About five feet away from the toy car is a wood entertainment center. The camera sat on the coffee table about two feet away from the first stack of checkers (9 feet away from the entertainment center). By setting the camera on the coffee table, two things happen: 1) I don’t have to break out the tripod to hold the camera still and 2) all the elements line up nicely so you can see them clearly. For this setup, I’m shooting indoors with limited (low!) light. The tripod becomes necessary because a) I don’t want to use flash, which means b) I’ll need to keep the shutter open longer to allow more light into the camera, but c) I don’t want blur. Hence, tripod – or just setting it on the coffee table.
For the following photos, the camera (a Nikon D50) was put in Aperture mode so I can control the aperture. The camera automatically controls the shutter speed and ISO in order to produce a correctly exposed photo. The photos were reduced to 500px wide, but were otherwise unprocessed (no cropping, color correction, filters, etc).
Changing the focus
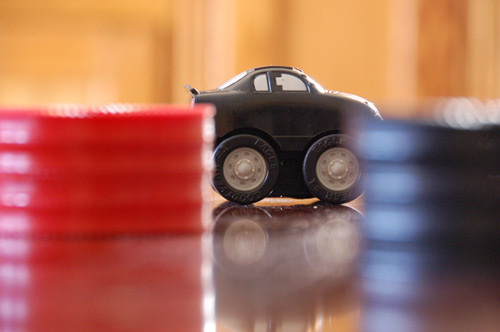 |
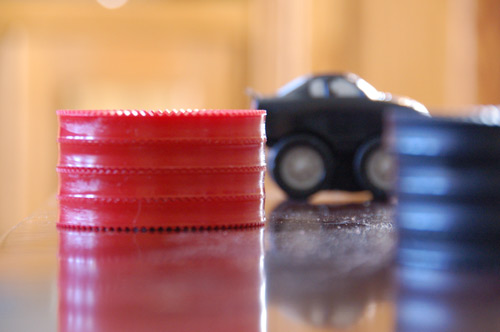
In this first photo, I’ve focused on the toy car. I’ve opened the aperture up all the way (f/5.6) which allows the most light in and results in the smallest field of focus. The camera chooses 1/6th of a second with an ISO of 1600.Note the small field of focus by observing what is in focus (car) and what is out of focus (red and black checkers, and you can kinda/sorta tell that the entertainment center is made of wood).
A: f/5.6 |
 |
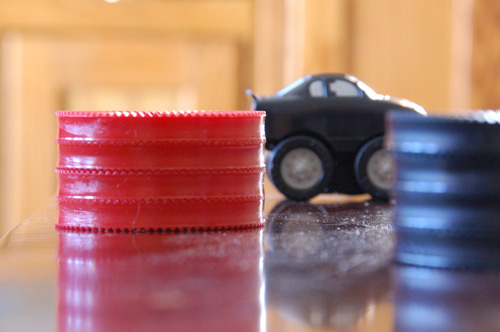
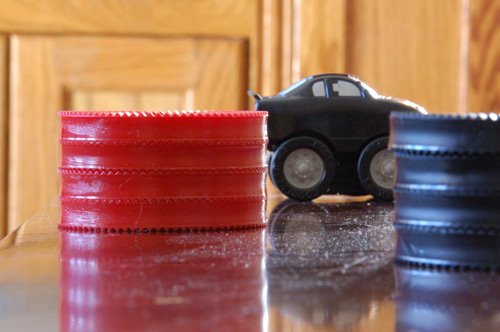
I’ve now focused on the red checkers. Don’t forget that these items are about 10″ apart. |
 |
And now the black stack of checkers. Note that the table’s dust and scratches (deliberately left on the table in order to enhance composition) are also in focus. The entertainment center, 9′ away from the camera, doesn’t even look like wood. |
 |
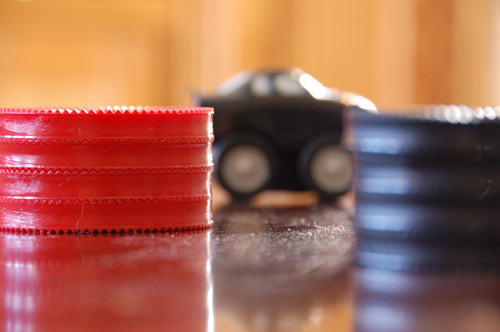
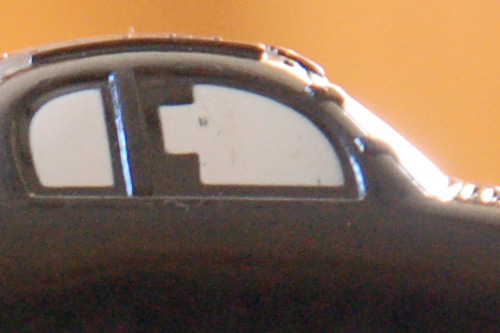
Here, the aperture is shut down as far as possible (f/36), and the depth of field is as large as possible. The camera is focused on the car, but the entertainment center and black checkers are almost in focus. In order to compensate for so little light coming through such a small aperture, the camera had to leave the shutter open for 6 seconds.Click here for a better view of the changes. |
Here’s a bonus photo to show what happens if we back out and go to 38mm (57mm equivalent). The black checkers are in focus.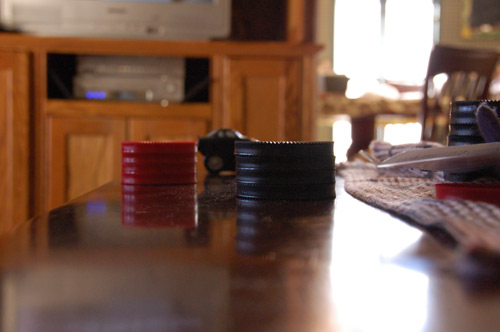 |
With a wider angle, more of the room is included, along with the dining room and the dining room window. With these additional elements in the photo, the light hitting the camera has changed, and affected the light quality of the entire photo. Notice how the black checkers are even darker. Even if we cropped out the unwanted items, the original three items presented are affected by the change in light quality.
A: f/5.6 |
Changing the aperture
In this next set of photos, I change the aperture. The camera automatically chooses the shutter speed (which changes on each photo) and the ISO (it stays at 1600 for all photos). Also note how the field of focus grows longer with the higher f-stops.
 |
In this set of photos, the red set of checkers is in focus. The black set of checkers (closer to the camera) and the car (further away from the red checkers) is out of focus. The red stack is not really in focus because at 150mm on this particular lens, the red checkers are *too close* to the camera. If I had zoomed out of the photo or backed the camera away, it would have come into focus. But that’s another topic.A: f/5.6 S: 1/6th ISO: 1600 Focal length: 150mm (225mm equiv) |
 |
As I crank up the f-stop to f/10, the aperture is smaller and less light gets in to the sensor. The camera compensates by decreasing the shutter speed (leaving the shutter open longer).A: f/10 S: 1/2 |
 |
By the time I get to f/14, the camera needs the shutter to stay open for a full second in order to get proper exposure.A: f/14 S: 1 second |
 |
Over two seconds of exposure time is required by the time I get to f/22. The car is almost in focus. We can now see that the background has wood grains running through it, even though it’s not in clear focus.A: f/22 S: 2.5 seconds |
 |
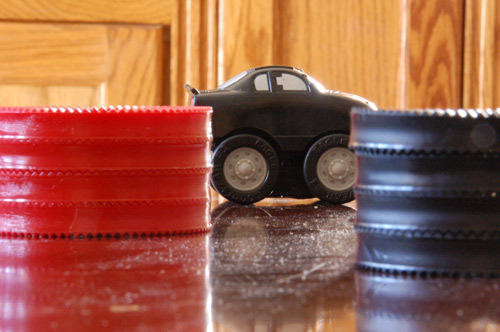
At f/36, the smallest aperture for this lens, the entertainment center is almost in focus.A: f/36 S: 1/6th Click here for a better view of the changes. Note that as the aperture closes, the camera compensates by increasing the time the shutter is open. |
Noise
 As mentioned earlier, in order to compensate for the low light, the camera has extended the shutter time and has raised the ISO. Raising the ISO allows the camera to “see” more in a low-light setting, however, it produces noise. Because the above photos have been reduced, the noise is not readily apparent. If we were to zoom in on the car in the first photo above, we would see the noise as reddish flakes.
By reducing the ISO, we automatically reduce the noise (and decrease the camera’s ability to see in a low-light setting). The actual amount of noise produced depends on the quality of the camera. In a digital SLR with a large sensor, it is possible to have a high ISO with relatively low noise. In a camera of lesser quality (a point-n-shoot, for example), the noise would be more drastic, producing an undesirable photo. If I had tried this shot with my point-n-shoot Nikon 3200, the noise would be downright unbearable and the photo would be too dark.
Hope you’ve enjoyed this presentation.