A fundamental concept to creating an interesting photo is exposure. Entire books have been written on the subject, but exposure, in its simplest terms, is the amount of light that falls on your camera’s sensor. As a photographer, you have three methods to control the amount of light that is used to create your photo: shutter speed, aperture and ISO. If you put your camera on Auto, it will happily choose the “correct” settings of shutter speed, aperture and ISO for you and give you an Average photo. But by taking control of your camera, you can bring interest to what might be an otherwise ordinary scene. To do so, it is necessary to understand how shutter speed, aperture and ISO interact to affect your photo. Each of these items can be changed independently of the other two, and each item affects two aspects of your photo. So let’s start with definitions and examples:
Shutter speed – This represents the amount of time your camera’s shutter is open and light is hitting your camera’s sensor. This is measured in seconds or, more often, in fractions of a second. Long shutter speeds allow more light to your sensor and also increases the amount of motion blur you might get on your photo. Shorter shutter speeds means less light and less motion blur. (Note: motion blur is the result of movement. It is unrelated to improper focusing.)
 |
||
| Shutter Speed | Fast shutter speed | Slow shutter speed |
| Effect | Less light allowed | More light allowed |
| Secondary Effect | Freeze action | Motion blur. Use tripod. |
| Sample Setting | 1/1000th sec | 1/10th sec |
| Examples | Spinning wheels frozen in time | Silky smooth waterfalls |
| Sports photography | Fireworks, blur trails, etc | |
Aperture – Your camera uses an iris, much like your eye, that contracts and expands to allow less or more light in. This is measured in “f-stops”. The wider the aperture (lower f-stop), the more light; the smaller the aperture, the less light. The aperture also has a secondary effect: it controls the “depth of field”. The depth of field is the zone in front of and behind your subject that is in focus. For example, in a photo of a flower in a bush, the photographer can use a shallow depth of field to have the flower in focus, but the bush behind it blurred (out of focus) for a pleasing composition.
|
||
| Aperture | Small aperture | Large Aperture |
| Effect | Less light allowed | More light allowed |
| Secondary Effect | Deep field of focus | Shallow field of focus |
| Sample Setting | f/22 | f/2.8 |
| Examples | Foreground and background in focus |
Foreground in focus, but background blurry (or vice versa) |
| Landscapes | Portraits | |
ISO – In the film world, all films are not created equal. A given roll of film can be less or more sensitive to available light. This sensitivity is measured in terms of ISO: A low ISO is preferable for photos in bright sun and a high ISO is preferable for indoor photography (where there will be low light) or sports photography (where there will be fast action and fast shutter speeds are required to reduce motion blur). The same concept of a sensitive medium is true for digital cameras, but instead of changing film, you simply select the sensitivity you want your camera to use. The secondary effect of using high ISO is that the photo will have less color saturation and will have noise, an undesirable effect. This is true for both film and digital cameras.
|
||
| ISO | Low ISO | High ISO |
| Effect | Less light sensitive | More light sensitive |
| Secondary Effect | More light required on the subject | Less light required, more noise |
| Sample Setting | ISO 100 | ISO 1600 |
| Examples | Low ISO allows the photographer to use longer exposures to get more motion blur (eg; waterfall) | High ISO allows the photographer to use shorter shutter speeds in order to freeze action (eg sports) |
| Low ISO allows the photographer to use higher apertures in order to get a smaller depth of field. | High ISO allows the photographer to use smaller apertures in order to get longer depth of field. | |
As you begin to play with the various settings on your camera and changing your shutter speed, aperture and ISO, you begin to get a feel for how each of the settings interact to affect your photos. But don’t feel the need to go it all alone – advanced digital cameras will allow you to vary these settings with “priority” modes. Shutter priority and aperture priority are common features on more advanced cameras. These modes allow you to specify one setting (shutter speed, for example) and let the camera try to compensate for your preferred selection in order to produce a properly exposed photo:
-Selecting Shutter Priority will let you specify the shutter speed you want and the camera will automatically control the aperture (and ISO, if you let it) so that your photo will be properly exposed.
-Selecting Aperture Priority will let you specify the aperture you want and the camera will automatically control the shutter speed so that your photo will be properly exposed.
So as you’re taking photos, consider the following:
-When taking sports photos, consider boosting your ISO to 800 (less light required) and opening your aperture (allows more light to the camera’s sensor) in order to use faster shutter speeds (allows less light to the camera’s sensor) so you can freeze actions. Just watch your ISOs because the higher your ISO, the more noise you get in your photo.
-When indoors and you don’t want to use flash, consider boosting your ISO (less light required), opening your aperture (allows more light in) and reducing your shutter speed (allows more light in) so that you won’t have to use flash. Beware: high ISOs cause noise and slower shutter speeds cause blur.
-When taking photos of a silky smooth waterfall, consider reducing your ISO (more light required) and closing your aperture (less light allowed in) so you can keep your shutter open longer (allows more light in) in order to get those silky smooth waterfalls.
-When taking close-up photos of flowers or insects, consider reducing your ISO (more light required) so you can open your aperture (allows more light in) so you can get one flower in focus and the background out of focus.
Examples
The following examples demonstrate variations to a scene when shutter speed and aperture are changed. If your camera has a Program Mode, this setting will allow you to change your shutter speed and aperture quickly while staying within the confines of a properly exposed image. Consult your manual for details.
Because the sample photos were taken on a bright day, the ISO was kept on its lowest possible setting.
| Shutter speed samples | Aperture samples | |
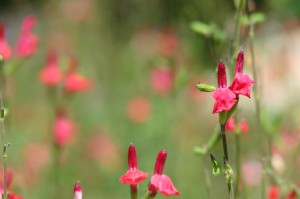
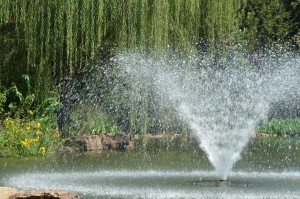
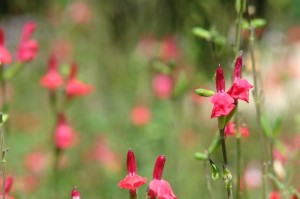
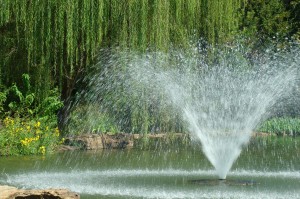
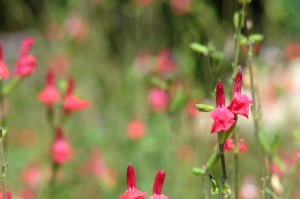
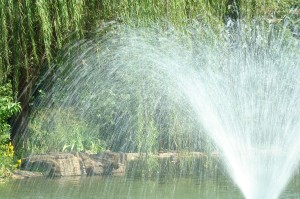
| In the waterfall example, we have quite a bit of movement so changes to the shutter speed will be noticeable in the water spray. In the first few photos, the water droplets are round and sharp. The longer the shutter stays open, the more the water droplets appear elongated & blurred and, hence, the smoother the water appears.However, keeping the shutter open longer means letting in more light, so, to keep from over-exposing the image, the aperture has been progressively stopped down (closed). Changing the aperture also changes the depth of field, but since both the foreground (waterfall) and the background (trees) are far away from the camera, the change in aperture does not produce a noticeable change of sharpness to the background. | In the flower example, the lens is zoomed in and focused on the main item of interest (flower on the far right). With the aperture wide open (f/3.7), the flower on the far right is in sharp focus, but the background (the rest of the flowers) are completely out of focus. This blurred effect gives the overall photo some interest without competing for attention. By progressively stopping down the aperture, the rest of the photo begins to come into focus. If the entire image were in focus, the eye would lack a central point of interest and the photo becomes less interesting.However, stopping down the aperture also reduces the amount of light, hence underexposing the photo. To compensate, the shutter speed has been reduced to allow more light in. Since there isn’t much movement in the photo, motion blur is not an issue. | |
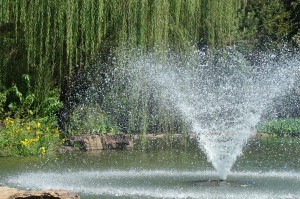 s: 1/640th; a: f/3.5; ISO80 |
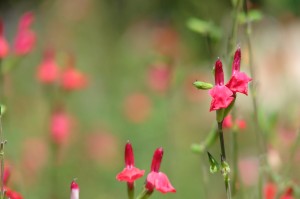 s: 1/500th; a: f/3.7; ISO80 |
|
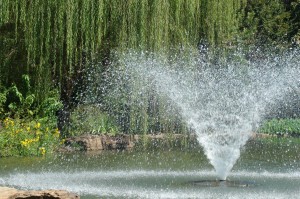 s: 1/200th; a: f/5.6; ISO80 |
 s: 1/320th; a: f/5.0; ISO80 |
|
 s: 1/125th; a: f/6.3; ISO80 |
 s: 1/160th; a: f/6.3; ISO80 |
|
 s: 1/50th; a: f/8.0; ISO80 |
 s: 1/125th; a: f/8.0; ISO80 |
 s: 1/15th; a: f/8.0; ISO80 |
If the water fountain photo had been exposed for anything faster than 1/640th of a second, the photo would have been underexposed and too dark. Raising the ISO could compensate for this, but for this particular scene, 1/640th is enough to freeze all motion, so there’s no real need for a faster shutter speed.If the exposure had been set for anything slower than 1/50th of a second, the water would be smoother, but the image would have been overexposed beyond the camera’s ability to faithfully represent the white water. As a photographer, you get to decide which is more appealing: maintaining “proper” exposure or getting a certain effect. |
 s: 10s; f/7.1; I:100 |
In this waterfall example, the shutter speed was set to 10 seconds. Normally, this long of an exposure would overexpose the white elements of the image (water, rock on far left). In order to achieve a very long shutter speed, a “neutral density filter” was used. A neutral density filter is a filter that attaches to the front of a lens and is the functional equivalent of sunglasses. It reduces the amount of light coming into the camera without changing the color of the scene. Because less light is hitting the sensor, the shutter is required to stay open longer in order to properly capture the scene without blowing out the whites. A tripod was required to hold the camera still for such a long time. |
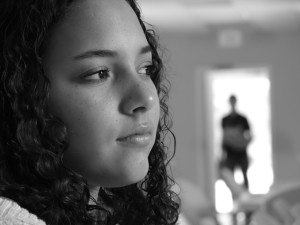 s: 1/20s; f/3.5; I:100 |
Varying shutter speed and aperture should not be limited to landscapes, of course. In this photo, the maximum zoom and lowest aperture was used. This maximizes the effect of the depth of field, therefore throwing the background completely out of focus. By placing the model on the left and obscuring the person on the right, the viewer is immediately prompted to ponder the identity and nature of the person on the right. Who is he? What does he intend to do? Is the subject aware of him? What does the subject think of him? This curiosity of the person in the background is enhanced because he is out of focus and we therefore know very little about him. And the human mind doesn’t like to have loose ends. By controlling aperture, what would have been a normal photo of a lady gazing out an unseen window on camera-right, now becomes a curious photo that makes us stop and wonder. |
Conclusion
Knowing how to control shutter speed and aperture puts you in charge of the scene; focus and motion blur become tools to help you direct the attention of people who view your photos.
And that can help you take photos worth framing.